")


When you think of Facebook ads for your ecommerce business, maybe you begin to wonder if it’s too expensive, if it’s too difficult to figure out, or if it’s still too early for your business to pay for advertising.
Facebook has over a billion monthly active users according to Statista. With Facebook ads, you have the opportunity to put your business and product in front of this very large and active user base. Many ecommerce businesses have been able to make the most of this opportunity and have grown their businesses significantly with Facebook ads.
In this article, we’re going to go through the basics and fundamentals of Facebook ads and provide you with a detailed overview of the platform, we’ll walk you through, step-by-step, how to create your first ad Campaign. so let’s dive into the world of Facebook ads and what they look like for ecommerce businesses.
What is Facebook Ads Manager?
Facebook has two ad management tools: Facebook Ads Manager and Power Editor.
Both of these tools are free. If you’re just starting out, we suggest that you setup your campaigns in the Ads Manager (Power Editor is a more complex tool that’s mainly used for managing large-scale campaigns. It’s mainly used by agencies and enterprise-level advertisers.)
By using the Facebook Ads Manager, you can:
- Set up Facebook ad campaigns
- Create new ad sets and ads
- Manage Facebook ad bids
- Target many different audiences
- Optimize your ad campaigns
- Keep track of your campaigns’ performance
- A/B test your Facebook ad campaigns.
How to use and navigate the Ads Manager
There are three ways to access your Facebook Ads Manager account:
- Use this link that will take you to your Ads Manager account (You better bookmark the link for quick access!)
- Click on the drop-down arrow in the upper-right corner of any Facebook page (that you have Admin access to) and select “Manage Ads” in the drop-down menu.
- Use Facebook’s Ads Manager mobile app to access and manage your ad campaigns anytime and anywhere.
To help you better understand your Facebook Ads Manager account, here’s a quick roadmap.
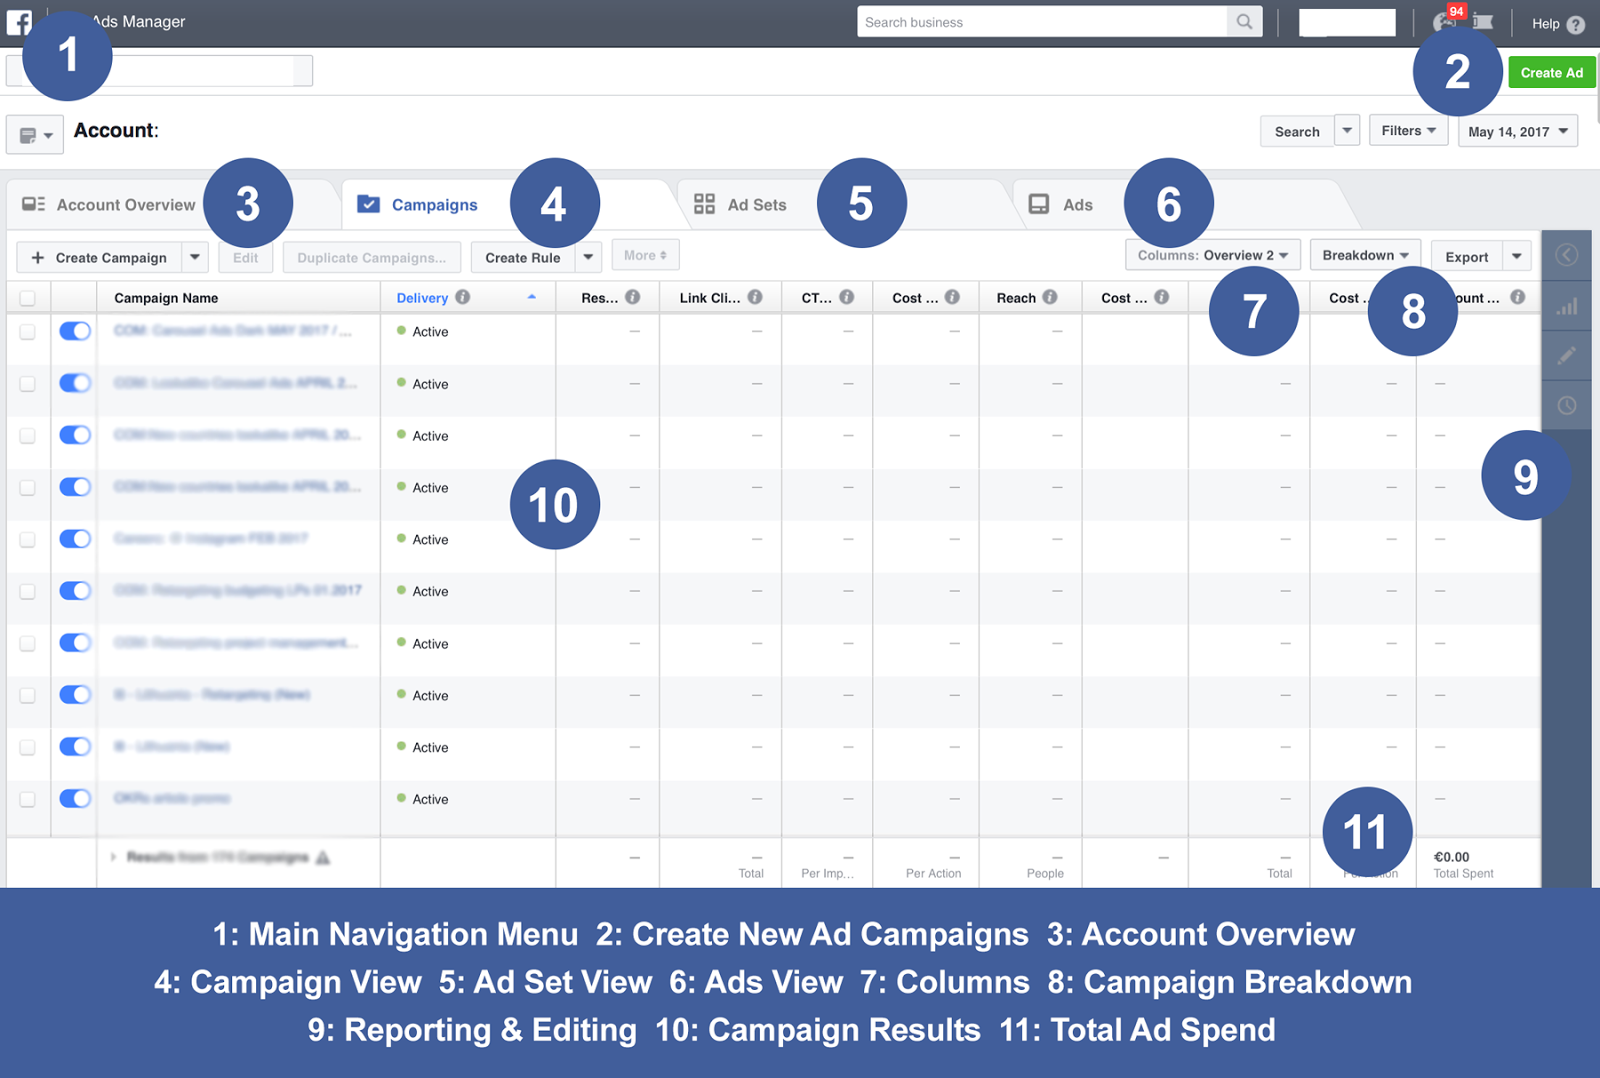
However, we suggest that you play around inside the Ads Manager and see what else you’ll discover.
If you’re left wondering where are all your Facebook audiences, advanced reports, etc., know that you can access all the important tools inside the Facebook Business Manager by using the main navigation menu in the top-left corner of your screen.

Now that you’re familiar with the navigation of the Facebook Ads Manager, let’s move fast to the part you’ve been waiting for: creating your first ad campaign on Facebook.
How to Set Up a Facebook Ad Campaign
Alright, let’s start with the basics, i.e. by answering the question “How can you start creating a new Facebook campaign?”
First, make sure you’ve chosen the Ads Manager tool from the top-left menu shown in the screenshot above. Then, click on the green “Create Ad” button in the top-right side of the page.
Et voila! You’ll be guided through the entire campaign creation funnel (image below). All you have to do is select your preferred options and enter some ad details like images and copy.
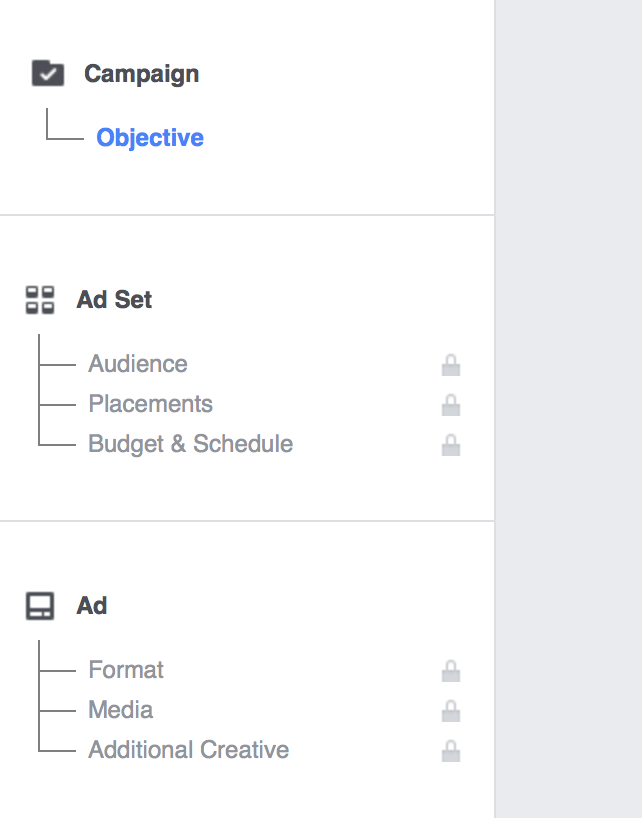
Let us show you how to do it, step by step.
Step 1: Select Your Campaign Objective
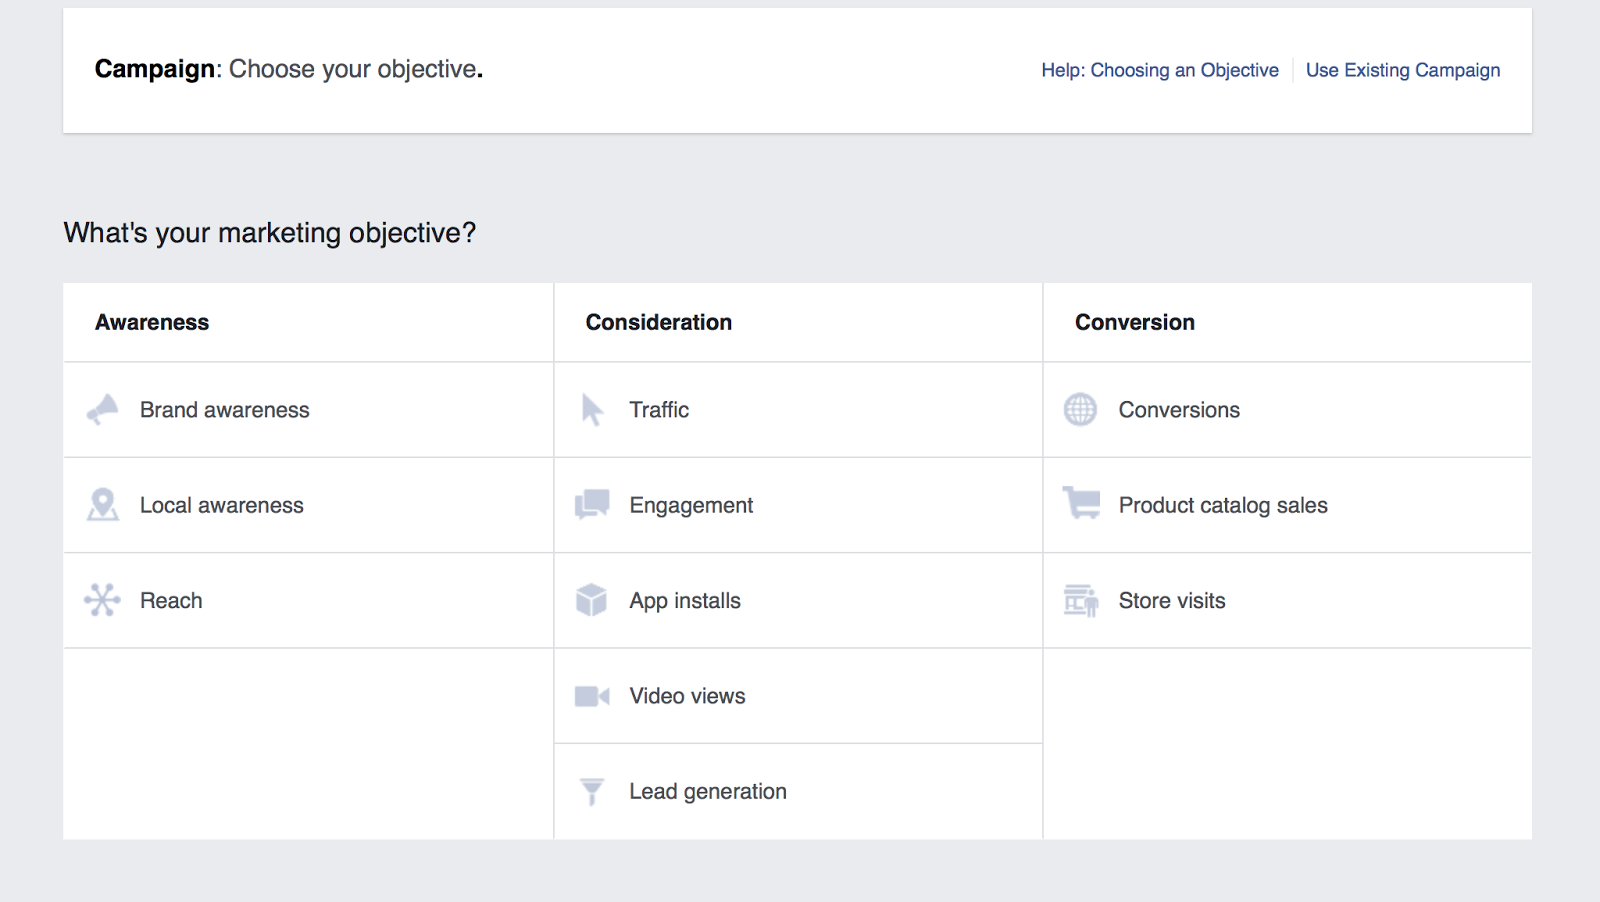
The first selection you’re going to make is choosing your campaign objective.
Here’s the complete list of Facebook campaign objectives available in the Ads Manager:
- Brand awareness
- Local awareness
- Reach
- Traffic
- Engagement
- All installs
- Video views
- Lead generation
- Conversions
- Product catalog sales
- Store visits
How to choose your campaign objective?
The reason Facebook’s asking about your campaign’s goal, i.e. objective, is because it will determine the campaign’s ad formats, bidding options, and auto-optimization.
If you tell Facebook your goal, it can auto-optimize your ads to deliver you more results.
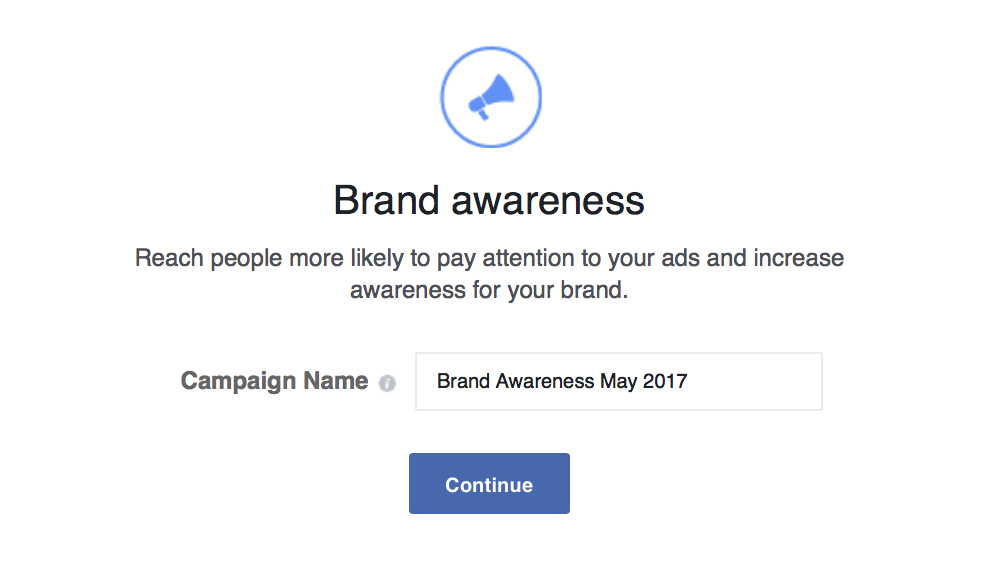
Anyway, we recommend that you always select the campaign objective that reflects on your end goal. Most of the time, it’s Conversions. However, if your campaign’s ultimate goal is to increase brand awareness, select the “Brand awareness” objective and so on.
Step 2: Give Your Ad Campaign a Name
Do I need to explain this point? Well, the name tells it all, but maybe I can share one of my secret tips with you: When naming your Facebook ad campaign, don’t forget to add the date range so that it will be easier to navigate between your campaigns later.
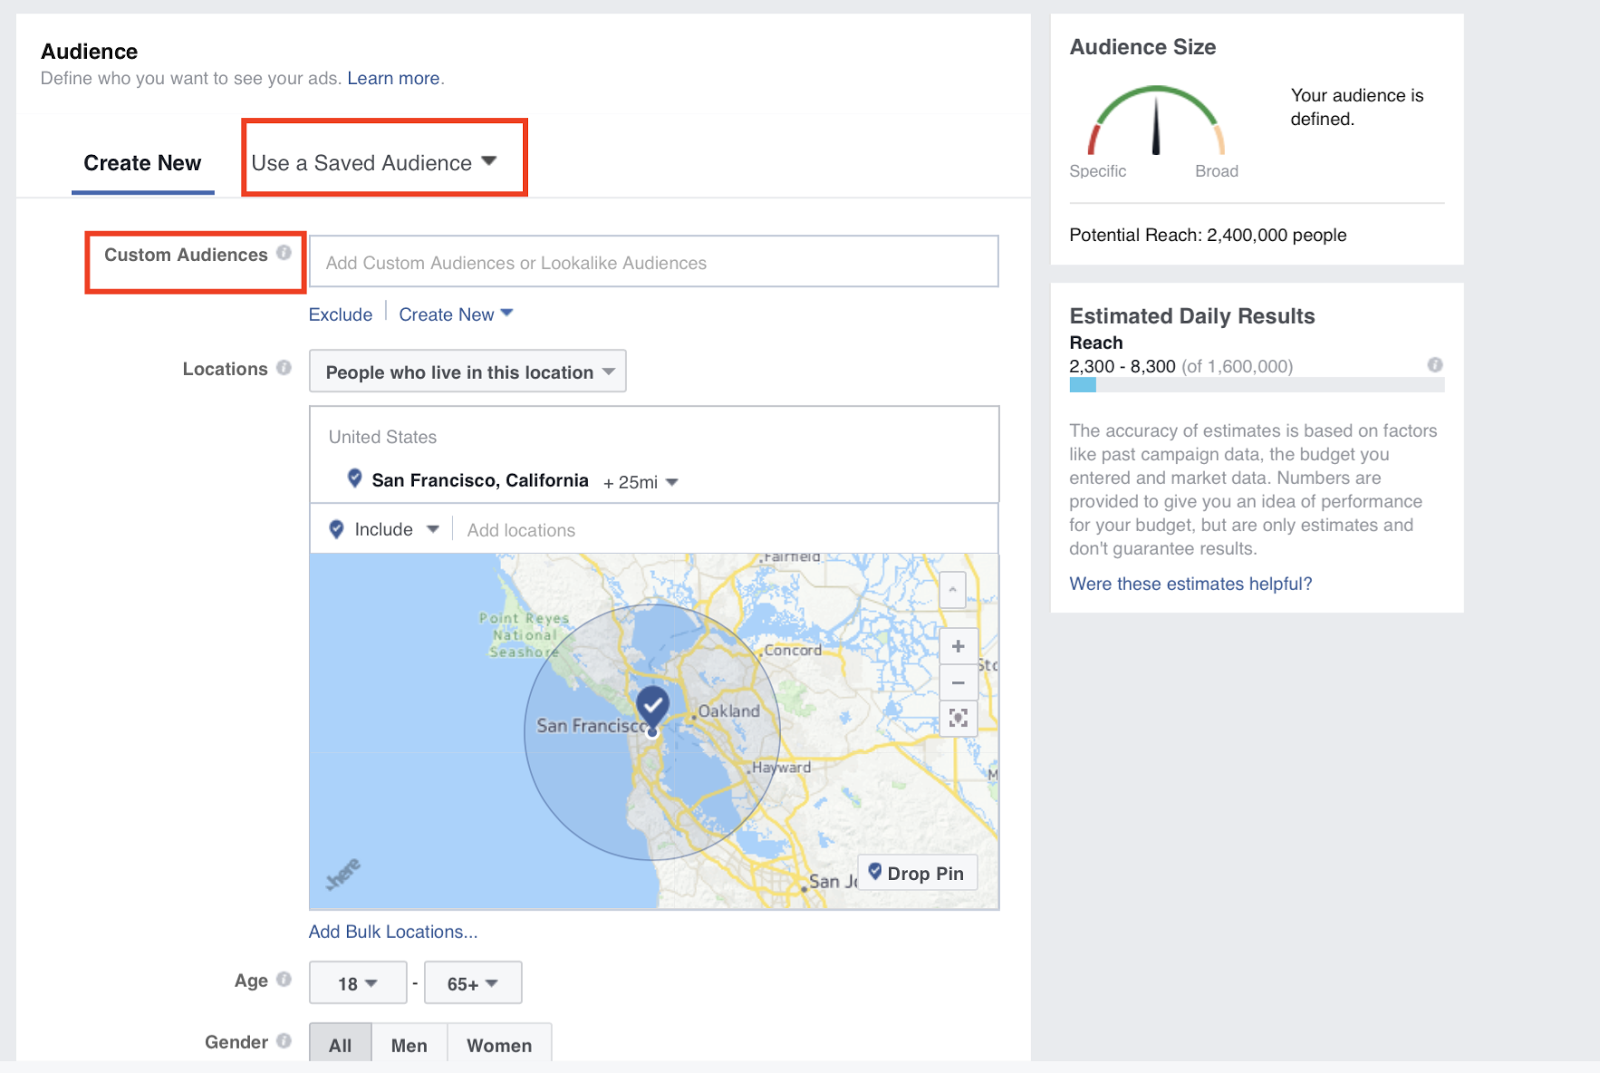
Step 3: Set Up the Audience Targeting
In this phase of your campaign setup, you have two options:
- Create a new Facebook target audience
- Use a Saved Audience
You can also select Custom Audiences that you’ve previously created in the Audience Manager. (Note that you can’t create new Custom Audiences in the campaign creation phase. You need to create these first in the Audience Manager).
You can also select Custom Audiences that you’ve previously created in the Audience Manager. (Note that you can’t create new Custom Audiences in the campaign creation phase. You need to create these first in the Audience Manager).
Step 4: Set Up Your Ad Placement
Facebook ads appear in multiple places, including:
- Facebook News Feeds (Mobile and Desktop)
- Facebook Right-Hand Column
- Audience Network
- Instant Articles
- In-Stream Video
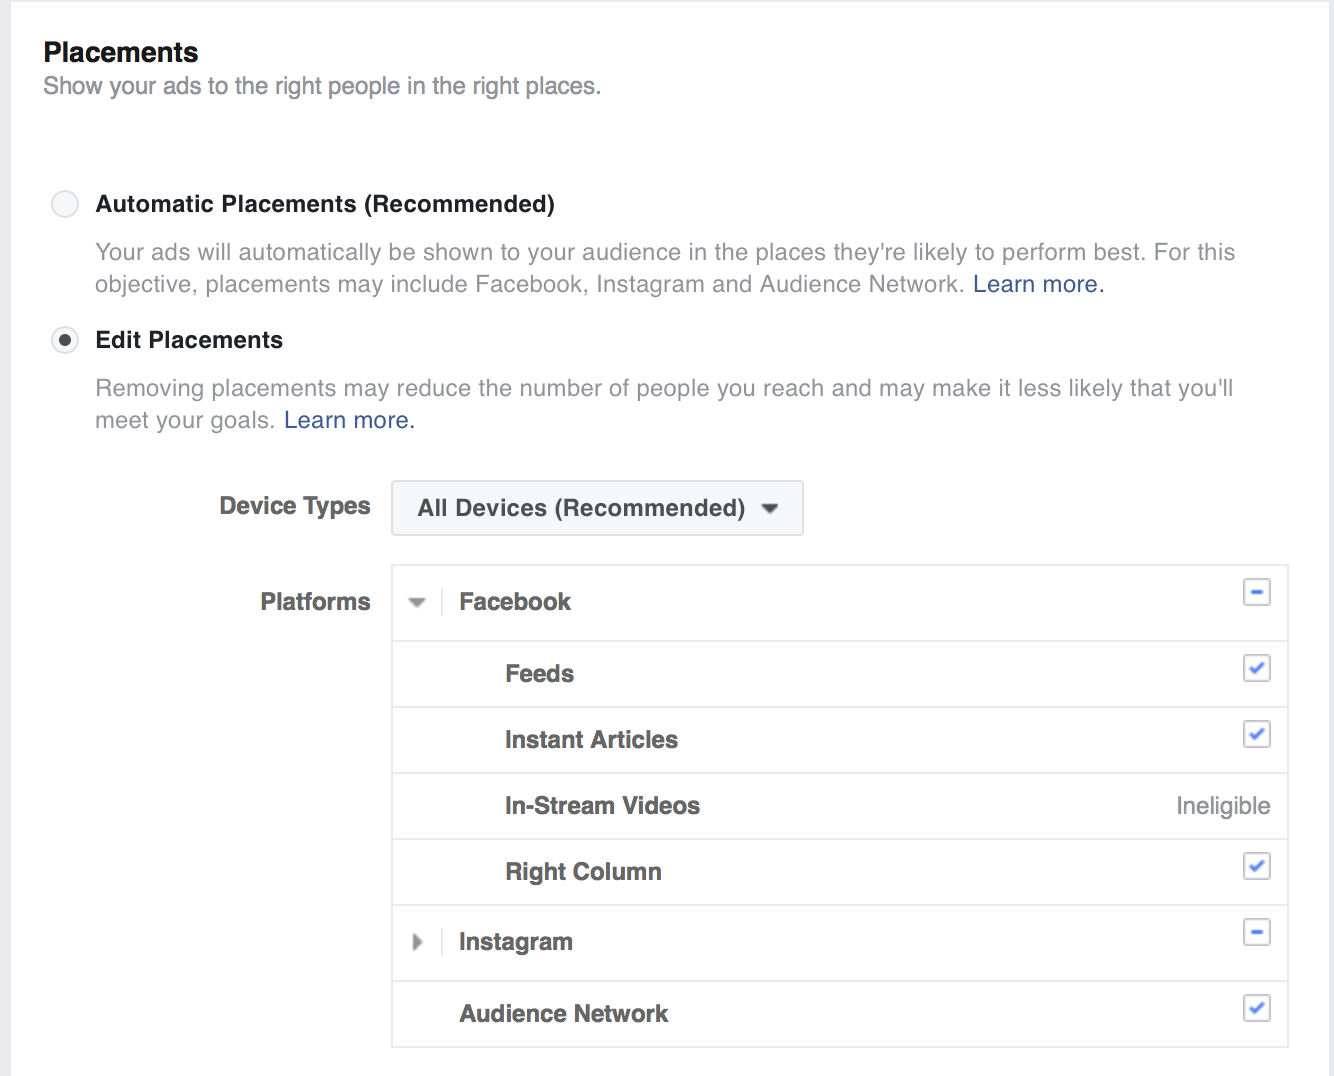
In this phase of your campaign setup, you have two options: you can either select the Automatic Placement or configure your ad campaign so that your ads are only shown in some “real estates” of Facebook’s advertising network.
While Facebook does a pretty good job auto-optimizing your ad placements, Facebook ad cost data shows that the cost-per-results can differ deeply, depending on the placement you’re using.
How to select your Facebook ad placements?
If you’re setting up your first campaign, we recommend that you use the Automatic Placements.
However, if you’re trying to get people convert on your website and it’s difficult to navigate on mobile, de-select the Mobile Newsfeed, Instagram and Audience Network placements.
Here are the ad placements recommended by Facebook for every campaign objective:
- Brand awareness: Facebook and Instagram
- Engagement: Facebook and Instagram
- Video views: Facebook, Instagram and Audience Network
- App installs: Facebook, Instagram and Audience Network
- Traffic (for website clicks and app engagement): Facebook and Audience Network
- Product catalog sales: Facebook and Audience Network
- Conversions: Facebook and Audience Network
Step 5: Set Up Your Campaign Budget and Bidding
Picking the right budget for your campaign is critical to success. The first step of the “Budget & Schedule” setup is to assign a budget for your campaign.
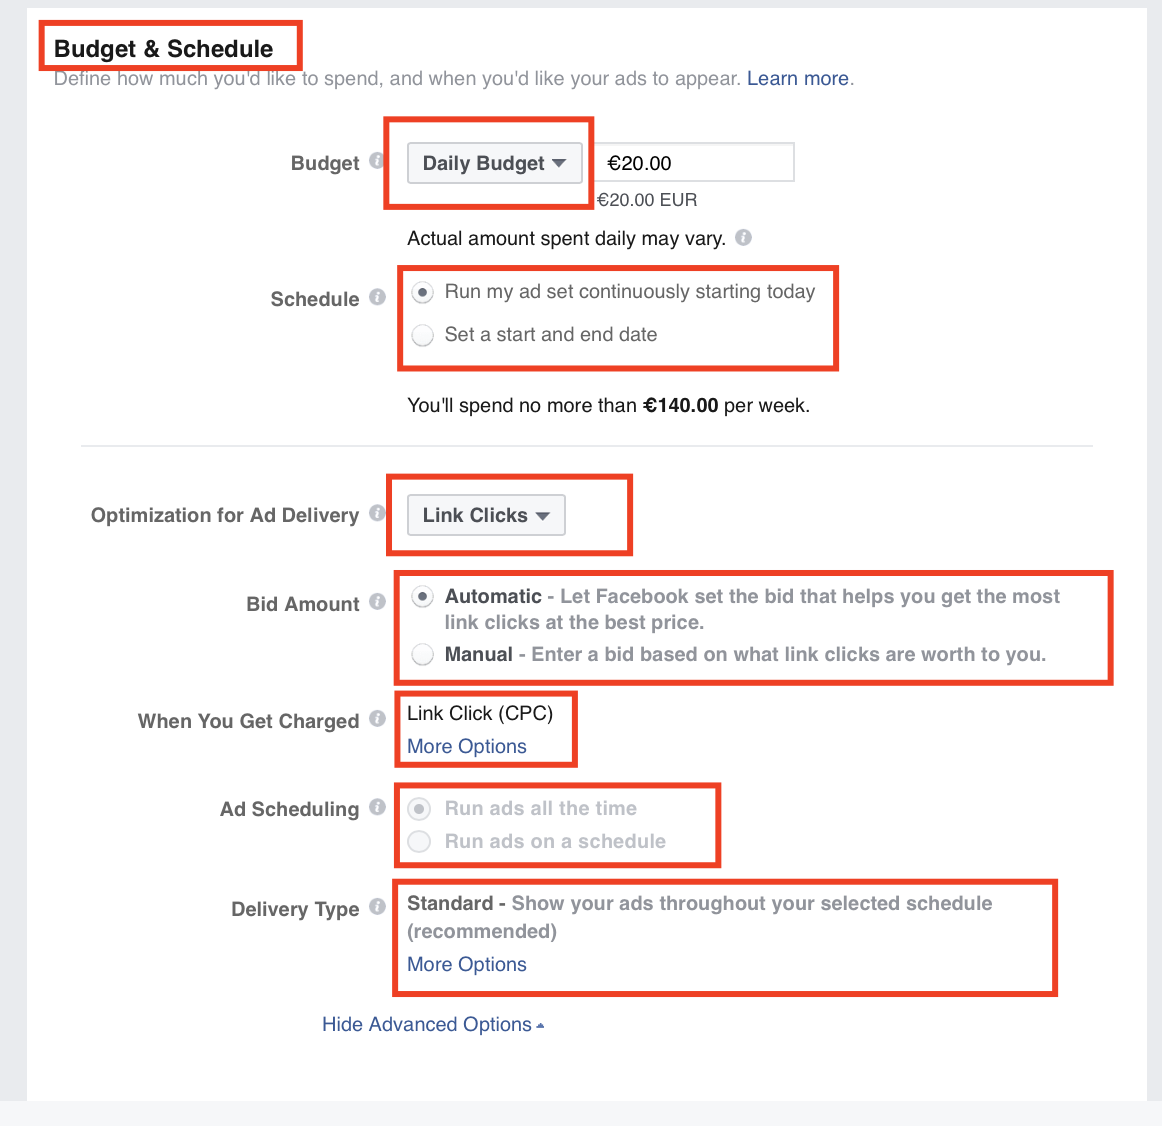
Facebook gives you two budgeting options:
1. Daily budget – Facebook will spend this sum on delivering your ads every day during your campaign. When you set your daily budget, you’re telling Facebook to get you roughly your daily budget’s worth of the results every day.
Some days, when Facebook spots high-potential opportunities, it may spend up to 25% more than your daily budget (and then lower the spend on the low-potential days). As you select the daily budget, your daily ad spend could look like a set of curves.
Don’t worry, that’s completely normal and means that Facebook’s auto-optimizing your ad delivery (which is a good thing).
2. Lifetime budget – Facebook will divide the total campaign budget more or less evenly across the campaign dates. If you set a lifetime budget, Facebook will ask you for the campaign dates, so that it can calculate the average spend for each day.
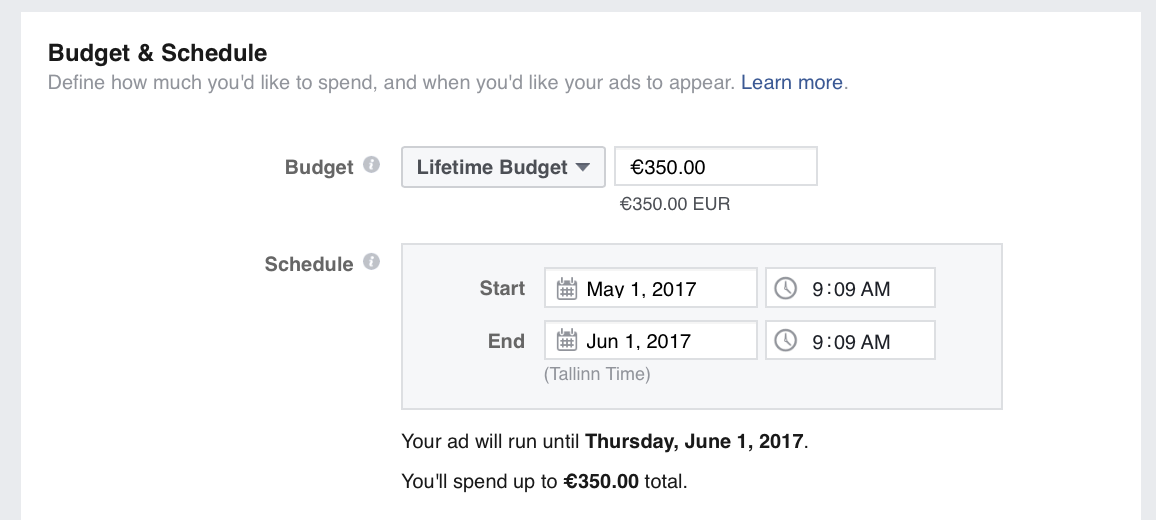
We recommend that you set a daily budget and an unlimited campaign duration, so that you can later edit the size of your daily budgets and pause the campaign whenever you see fit.
Important! You can’t change an ad set’s budget type after the ad set has been created. Make sure you make the right selection during the campaign setup.
Facebook Ads Bidding – How it Works?
As you advertise on Facebook, you’ll be competing with hundreds of thousands of advertisers, each wishing to reach their target audience. Facebook ad bidding works on an auction basis. Who’s winning the bid? – The advertiser who has the best combination of best bid, relevance score, and “estimated action rates.”
Manual vs. Automatic Bidding
If you’re putting your first steps in the world of Facebook advertising, we suggest that you use the Automatic bidding. This way, you don’t need any previous knowledge about the average bids and the average cost-per-result.

Use the manual bidding if you know how much the results are worth to you. For example, when optimizing your ad set for Link Clicks, you can set the highest price per click you’re willing to pay. As you set a manual bid, Facebook will show you the range of suggested bids and automatically inserts a suggested bid in the box.
Always change the Facebook’s pre-set manual bid in the custom bidding box. For example, if Facebook first suggests that you bid €1.0 per link click and the bid range is (€0.43–€0.88), you could bid €0.60 or even €0.44.
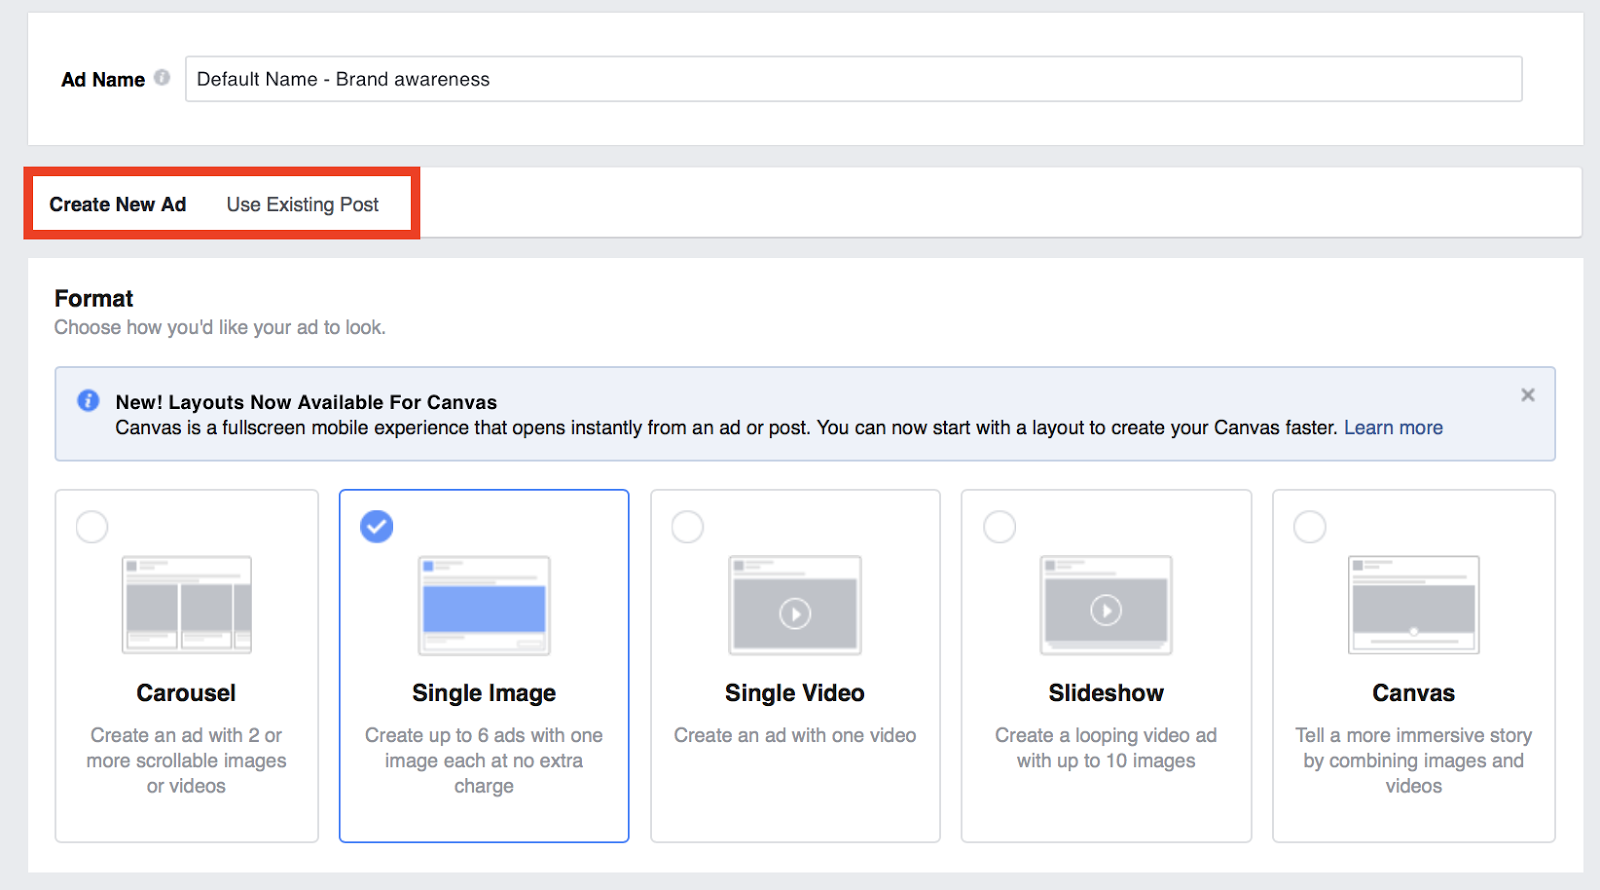
Step 6: Set Up Your Facebook Ads
As the final step of your campaign setup process, you can select your preferred Facebook ad type and insert your ad images and copy.
You can either select an existing Facebook Page post or create new ads:
Set Up Your Facebook Ad Copy
Setting up your ad copy is super easy. All you need to do is enter text in the right fields.
You’ll also see a preview of your ad campaign. If you’re testing multiple ad images or wish to see how your ad looks on different screens (Desktop vs. Mobile), you can do so by selecting other views from the two menus highlighted in the image below.

You have three choices when it comes where your Facebook Ads will appear: the News Feed, Mobile, and right column.
Many marketers assume right column ads are a waste of money since they don’t perform as well as News Feed ads. However, right side ads are relatively cheap and you’ll never know which ad type is best for your campaign without testing. Give them a try.
Another thing to keep in mind is mobile targeting. Some advertisers make the mistake of sending users who click mobile ads to non-mobile optimized sites. Only use mobile advertising if your site is mobile-friendly otherwise you’ll waste lots of money since Facebook mobile generates lots of clicks.
Removing a target is pretty simple. When creating an ad, you’ll have three tabs to check a preview of it in the three available placements. At the end of each placement’s tab, you have a “Remove” link. Just click it to disable a placement.
Et voila! You’ve created your first Facebook ad!
Internet Marketer, Sales Manager, eCommerce Expert, and Community Manager at – Ecomhunt


